How to Transform Your Charlotte Backyard with Three Weekend DIY Projects
Create a lounge zone, grow herbs and veggies, and fix that muddy cut‑through with climate‑savvy DIY ideas for Charlotte homeowners and renters

Charlotte summers make you want to live outside, but a lot of backyards just aren’t there yet. Maybe your “patio” is a grill on a patch of grass, your garden lives in randomly collected pots, or you’re hopping through mud every time you take the dog out at night.
The good news is that you don’t have to pour a full concrete slab or hire a crew tomorrow to make your yard work better. With some planning and a basic run to the local hardware or garden center, you can carve out a seating area, start a real garden and fix the torn-up traffic zones in a couple of weekends (or just one if you’ve got the time, heart and money).
We pulled together three projects that check all the boxes for Charlotte DIYers: they work in heat and humidity, respect usual HOA regulations, and don’t require a professional tool collection. Pick one to start or try all three; it’s your roadmap to a backyard that actually reflects the time and money you put into it.
Project 1: Weekend Pea Gravel Patio or Lounge Zone
Create a defined hangout space without pouring concrete.
Best for: small backyards, side yards, seating zones, fire-pit areas. Skill level: beginner to intermediate. Time: one weekend. Budget: lower than pavers or poured concrete
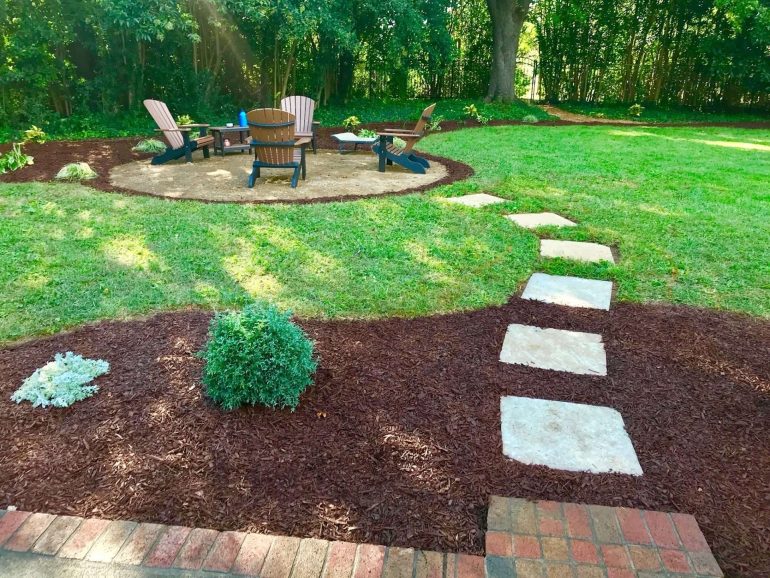
Smart upgrade: Blend the patio into the yard with a short stepping-stone path or a pair of large planters. It makes the project feel integrated instead of dropped into place.
Some backyard upgrades require permits, contractors and a budget that quickly balloons. A pea gravel patio, on the other hand, is approachable, affordable and surprisingly transformative, especially for yards that need better drainage, clearer function and a little more charm. Well-built gravel patios rely on a defined border, a stable base, landscape fabric, and a 2-to-3-inch gravel layer, which makes them practical for weekend DIYers looking for that “wow” factor.
If your outdoor space currently comprises a grill on grass, a pair of chairs with nowhere to land, or a muddy patch that never quite became a patio, this project could solves several of your problems. It will create a dedicated zone for lounging or dining that takes on water well and can be styled up with planters, pavers or lighting once the base is in place.
What you’ll need: Measuring tape • Stakes and string or marking spray paint • Shovel and hard rake • Tamper or plate compactor • Landscape fabric • Edging material such as steel, composite, brick, or pressure-treated lumber • Crushed stone base, if needed for stability • Pea gravel • Wheelbarrow and work gloves
Step 1: Choose the spot and size
Choose a spot that feels close enough to the house to be convenient but far enough away to feel like its own area. A footprint of about 8-by-10 feet or 10-by-10 feet is enough for a pair of lounge chairs, a bistro table or a compact dining setup, which makes it a good fit for both small and midsize yards.
Before digging, think about how the space will actually be used. If the goal is morning coffee, utilize a spot that catches softer light. If it will be used for entertaining, keep it near the grill, door or an existing patio.
Step 2: Create the border
Use stakes and string, a garden hose or marking paint to lay out the shape on the ground. Rectangles and squares are the easiest to build, but a gentle curve can soften a small yard and feel more landscaped.
Walk the perimeter before you commit. Make sure there is enough space to pull out chairs, move around a table or add planters without everything feeling cramped.
Step 3: Prep the base
Remove all grass, weeds, roots and debris inside your site. Dig down several inches so the finished patio will sit neatly in the yard rather than looking like it was dumped on top of the grass. Utilize the hard rake for this step, scraping the surface repeatedly and removing excess soil with your shovel.
This is especially important if your yard has compacted soil or drainage issues. Charlotte-area yards often hold heavy clay and are susceptible to pooling water, so taking time to prep the base will make the patio more stable and last longer.
Rake the area smooth and tamp the soil down firmly. If the ground is especially uneven or soft, add a thin layer of crushed stone first then compact it to create a more solid base for the gravel.
Keep a slight slope away from the house so water moves off the patio instead of settling in the middle. It does not need to be dramatic, just enough pitch to encourage drainage.
Pro tip: If you’re dealing with an area that’s known to get soggy, this is a good time to dig a shallow channel to direct water away or add a thin layer of crushed stone under the fabric (next step). Crushed stone in a channel is one of the most frequently used drainage solutions short of going with a full French drain install.
Step 4: Install edging and landscape fabric
Edging will keep the patio looking intentional instead of temporary. Install metal, composite, brick or timber edging around the perimeter and secure it according to the product directions.
This step matters more than people think; good edging helps hold the gravel in place, maintains the shape, and gives the project a finished, professionally designed look. When placing the edging, it should be placed in the base to separate it from the yard, not placed above the base.
Roll the landscape fabric across the cleared area and cut it to fit. Overlap the seams slightly if you need more than one strip, then pin it down so it stays flat. Home improvement stores sell pins specifically for landscape fabric, usually nearby in the same aisle.
The fabric helps separate the gravel from the soil below and slows weed growth, meaning less maintenance later.
Budget option: You can use pavers or bricks you already have to create a simple border. I have had success using remaining scraps of treated lumber with minimal digging to reinforce them.
Step 5: Add and level the gravel
Pour in the pea gravel and spread it evenly with a rake. A few inches of gravel usually creates enough depth to feel substantial underfoot while still being easy to level. No human has ever correctly guessed the exact amount of pea gravel they need for a given project, so perhaps schedule time for a second trip to the hardware store.
Check the surface as you go. You want it to feel even and comfortable to walk on, with no obvious low spots where water might collect or furniture may wobble.
Step 6: Style it!
Once the gravel is level, add furniture and accessories that define your planned usage for the patio. A pair of chairs and a small table create a simple lounge. A dining set, umbrella and planters make an outdoor room.
Large containers at the corners help anchor the space visually. An outdoor rug made for gravel-friendly use, a fire pit or string lights nearby can make the finished area feel more polished without adding much cost.
Project 2: Raised Bed or Container Garden Starter Zone
Grow herbs, veggies, and pollinator plants even in clay and tiny yards.
Quick Facts: Best for: beginners, small yards, side yards, sunny fence lines; Skill level: beginner; Time: one weekend; Best payoff: fresh herbs, easy vegetables, and a yard that feels more alive
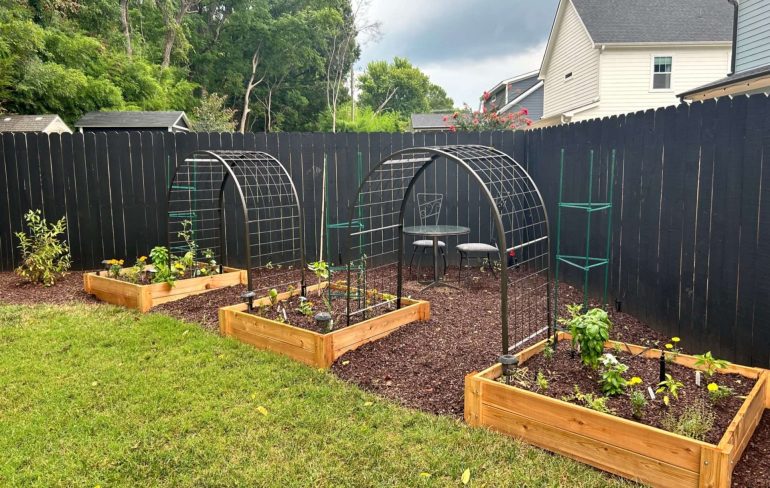
Smart upgrade: Add a gravel or mulch path around the bed to keep the area neat and easier to access after rain. Raised beds surrounded by clean pathways tend to feel much more polished.
A raised garden bed is a great way to start growing in a yard that has compacted soil or inconsistent drainage and not much usable space. It offers control over the soil, keeps planting manageable, and makes it easier to grow herbs, vegetables and pollinator-friendly flowers without fighting whatever is going on underground.
Raised beds do best in a relatively level area with at least six hours of sun and easy access to water. Many beginner guides recommend a width of about 3 to 4 feet so the center stays easy to reach.
For Charlotte homeowners, that combination matters. If the native soil feels heavy, sticky or unreliable, a raised bed lets you sidestep a lot of those frustrations and focus on plants that actually have a chance. Good soil mix is the key and extension guidance suggests filling beds with a compost-rich mix, often around a 1:1 blend of compost and soilless growing mix, with some topsoil added in certain cases.
What you’ll need: Tape measure • Shovel and garden fork or spade • Drill/driver with bits and driver tips • Hand saw or circular saw (if cutting lumber) • Level • Wheelbarrow or buckets for moving soil • Work gloves • Raised-bed or garden soil mix • Mulch for the top • Plants or seeds (herbs, veggies, and/or flowers) • Rot-resistant lumber or raised-bed kit panels • Exterior-grade deck or construction screws
Step 1: Pick your spot and scale
Most vegetables, herbs and flowering annuals need at least six hours of sun a day, so start there. Raised-bed guides consistently recommend choosing a spot that is relatively level and close to a hose or spigot because convenience matters when summer heat kicks in.
That last point is easy to underestimate. A garden bed tucked into the farthest corner of the yard may look nice on day one, but if it is a hassle to water you’re less likely to maintain it regularly.
HOA tip: For homeowners in HOA neighborhoods or renters, three to five large containers (think 16–24 inches wide) along a fence or patio edge can do the same job.
Step 2: Build or place your bed/containers
There are endless videos, plans and products to purchase. This article is to help give ideas, but if you want plans for building your own garden planter box, check out YouTube!
Wood is the classic choice for a simple raised bed, but metal kits and other ready-made options can work too.
Build a rectangular frame, place it on the cleared ground, and make sure it sits level before you fill it.
Clear away grass and weeds where the bed will sit, then loosen the soil below with a garden fork or spade rather than flipping it over completely.
Some home gardeners add cardboard, landscape fabric or hardware cloth at the bottom, depending on the site and whether they are trying to suppress grass or protect the bed from burrowing pests.
Step 3: Use the right soil mix
Do not fill the bed with straight clay from the yard. Instead, use a rich mix of compost and growing media designed for raised beds. Experts recommend a 1:1 blend of compost and soilless growing mix, with topsoil sometimes added depending on bed depth and conditions.
Other gardening sources recommend variations on that formula, often combining topsoil, compost and organic matter in ratios that prioritize drainage, nutrients and water retention. Regardless of which mix you use, the goal is loose, fertile soil that holds moisture without staying waterlogged.
Step 4: Choose “easy win” plants for Charlotte
- Herbs like basil, rosemary, thyme and mint (in its own pot).
- Heat‑loving veggies like cherry tomatoes, peppers and bush beans.
- Pollinator‑friendly flowers like zinnias, salvia, and coneflower.
Arrange taller plants toward the back or center and shorter ones along the edges for a full look without shading everything out.
Step 5: Set up watering and maintenance
Once planted, water the bed thoroughly so moisture reaches the full depth of the soil. Then add a light mulch layer to help regulate temperature, reduce evaporation, and slow weeds.
This matters in summer. Raised beds can dry out faster than in-ground planting, especially in full sun, so building a simple watering habit early saves trouble later.
Water tip: Add a simple drip kit or soaker hose if you can. Otherwise, commit to a quick watering each morning during the hottest months. Check moisture by sticking your finger a couple of inches into the soil and if it’s dry there, it’s time to water.
Project 3: DIY Path and Lighting Refresh
Fix the muddy cut‑through and make your yard feel inviting after dark.
Quick Facts: Best for: side yards, garden access, back doors, patio-to-gate routes; Skill level: beginner to intermediate; Time: one weekend; Biggest payoff: cleaner movement, less mud, and better nighttime use
Smart upgrade: Match the path material to another feature in the yard, such as a gravel patio, planter border, or raised bed. Repeating materials makes the whole landscape feel more cohesive.
Some outdoor projects are less about “wow” and more about relief. A clean path and a few well-placed lights can fix the muddy shortcut, the dark side of the yard, or the awkward stretch between the patio and the gate that nobody enjoys using after sunset. Path projects typically start with clearing and excavating the route, adding a compacted base, setting stones or gravel, then layering in lighting that matches how the space is used.
That makes this one of the best DIY upgrades for a real-life yard. It adds function first, but the visual payoff is immediate, too. Solar lights are the easiest entry point for most homeowners while low-voltage systems offer a more polished result for those ready to take on a slightly bigger project.
What you’ll need: Tape measure • Shovel or edging tool • Rake • Tamper for compacting base material • Utility knife or shears (for landscape fabric) • For low voltage: wire stripper, screwdriver, and possibly a small trenching tool • Work gloves • Solar path lights or low-voltage path lights • Stepping stones, pavers, or flagstone • Gravel, crushed stone, or paver base • Edging (metal, plastic, brick, or timber) • Landscape fabric for under the path
Step 1: Map the real path
Before you buy materials, pay attention to where people naturally walk. The grass has likely been matted down or worn away along this traffic lane. That “desire path” is more useful than a geometric line dreamed up on paper.
Once you know the route, outline it with a hose, stakes or marking paint. A straight run feels crisp and modern while a gentle curve feels softer and more garden-like. Keep the width practical; even a narrow path should feel comfortable enough for regular use.
Step 2: Choose your materials
Good DIY‑friendly options:
- Stepping stones set in mulch or gravel
- Pavers laid in a simple pattern
- A narrow pea gravel path to match your lounge area (Project 1)
For tight budgets, stepping stones spaced in a “hopscotch” pattern through mulch works well and uses fewer materials.
Step 3: Prep the ground
Remove grass, weeds and a few inches of soil along the marked path (Same as in Project 1).
If the path tends to stay wet, add a layer of crushed stone or base gravel and compact it before setting anything on top. That extra prep improves drainage and helps prevent wobbling stones later.
Pro tip: Keep the path slightly crowned (higher in the center) or with a gentle tilt to one side so water doesn’t sit on top.
Step 4: Set stones or lay gravel
If you are using stepping stones, place each one on a leveled bed of fine gravel, decomposed granite or paver sand rather than setting it directly on dirt. Use a rubber mallet to gently pound the pavers into the leveled bed.
If you are going with gravel, add edging and landscape fabric first, then fill the path until the material sits just below the top of the border.
Check that the finished surface is stable underfoot with no rocking stones or ankle‑twisting gaps. Use sand and the rubber mallet to make small adjustments.
Sand is essential for setting and leveling your outdoor projects, grab an extra bag at the hardware store and keep it for the next one.
Step 5: Add lighting
Think about what you want the lights to do. Are they there to guide feet safely along the path, highlight landscaping or create a softer evening mood?
For most homeowners, the easiest approach is a series of solar path lights placed along one or both sides of the route. For a more built-in look, low-voltage path lights offer stronger, more reliable illumination, but they require wiring, a transformer and more planning.
Safety tip: Make sure any wiring is rated for outdoor use and buried or shielded per manufacturer instructions. Be careful not to dig too deep without calling 8-1-1 first.
Charlotte climate tip: Choose fixtures rated for heat and humidity, and clean the solar lenses a couple of times a season to keep the light output strong.
You don’t have to do all three of these projects in a single season for your yard to feel different. Even one weekend spent carving out a small patio, planting a starter garden, or fixing a muddy cut‑through can change how often you step outside and how long you stay there.
Think of these as building blocks. A defined seating area, a pocket of green that thrives in our climate and a path that looks good day and night. Throw in some furniture, a grill, maybe a few string lights and suddenly your yard stops being that thing you feel guilty about and becomes an extension of your home.